1. WAN communication over TCP
This tutorial covers the first steps in setting up a WAN DDS communication over TCP.
More specifically, we will run a DDS Subscriber on a machine deployed on a local network A and a DDS Publisher on a machine deployed on a local network B.
Both DDS entities will communicate over the Internet by means of the DDS Router.
Warning
This tutorial is intended for WAN communication.
However, if there is only access to a LAN communication, it is possible to follow the tutorial by changing the DDS Domain Id so DDS entities in LAN A use default Domain (0) and those in LAN B use DDS Domain 1.
This way the DDS entities are logically isolated and will not discovery other entities out of their DDS Domain.
The image below describes the scenario presented in this tutorial.

Several key elements can be observed in it:
Fast DDS Subscriber and Fast DDS Publisher. The application used for this tutorial is the BasicHelloWorldExample. The BasicHelloWorldExample is a Fast DDS application that implements a subscriber and a publisher, to which a configuration of basic DDS and QoS parameters such as DDS domain, transport, communication reliability, among others, can be applied.
DDS Router. eProsima DDS Router is an end-user software application that enables the connection of distributed DDS networks. That is, DDS entities such as publishers and subscriber deployed in one geographic location and using a dedicated local network will be able to communicate with other DDS entities deployed in different geographic areas on their own dedicated local networks as if they were all on the same network through the use of DDS Router.
This example presents two routers that enable Internet communication:
DDS Router Net A. This is the DDS Router that is deployed on LAN A and configured as TCP client. This way it is possible for the robot to communicate out-of-the-box with an external DDS Router configured as TCP server.
DDS Router Net B. It plays the server role in the communication. It will expose a public network address to which client DDS Routers connect to establish communication.
It is important to mention that there is no correlation between DDS Publisher and Subscriber and TCP client and server. That is, the functionality of the DDS entity is independent of its behavior in TCP communication. Thus, although one DDS Router acts as a TCP client and another as a TCP server, both share information in both directions of communication.
1.1. Prerequisites
1.1.1. Hardware requirements
This tutorial will require two machines (Deploymen Net A and Deploymen Net B) deployed on different networks (LAN A and LAN B). It is possible to simulate the scenario by deploying everything needed on the same machine and two virtual networks but let’s focus on the case of a real deployment.
1.1.2. Software requirements
You have two options:
Install all components individually on each of the machines. If you follow this option, you will need to install:
Use the Fast DDS Suite. This is a publicly available Docker image that contains all the software needed for this tutorial. You can download this Docker image from the eProsima downloads website.
To load this image into your Docker repository, from a terminal run
$ docker load -i ubuntu-fastdds-suite:<FastDDS-Version>.tar
You can run this Docker container as follows
$ docker run -it ubuntu-fastdds-suite:<FastDDS-Version>
1.2. Deployment on Net A
First, let’s deploy the Fast DDS Subscriber and DDS Router Net A on a machine on LAN A.
1.2.1. Running Fast DDS Subscriber
Run a Docker container using the Fast DDS Suite image.
docker run -it ubuntu-fastdds-suite:<FastDDS-Version>
Run the Fast DDS Subscriber executing the following commands:
goToExamples
./dds/BasicConfigurationExample/bin/BasicConfigurationExample subscriber --transport udp
1.2.2. Running DDS Router Net A
As you know, DDS Router is configured through a YAML configuration file. Therefore, since we are going to run DDS Router from a Docker container, this file must be shared so that it is accessible within the container.
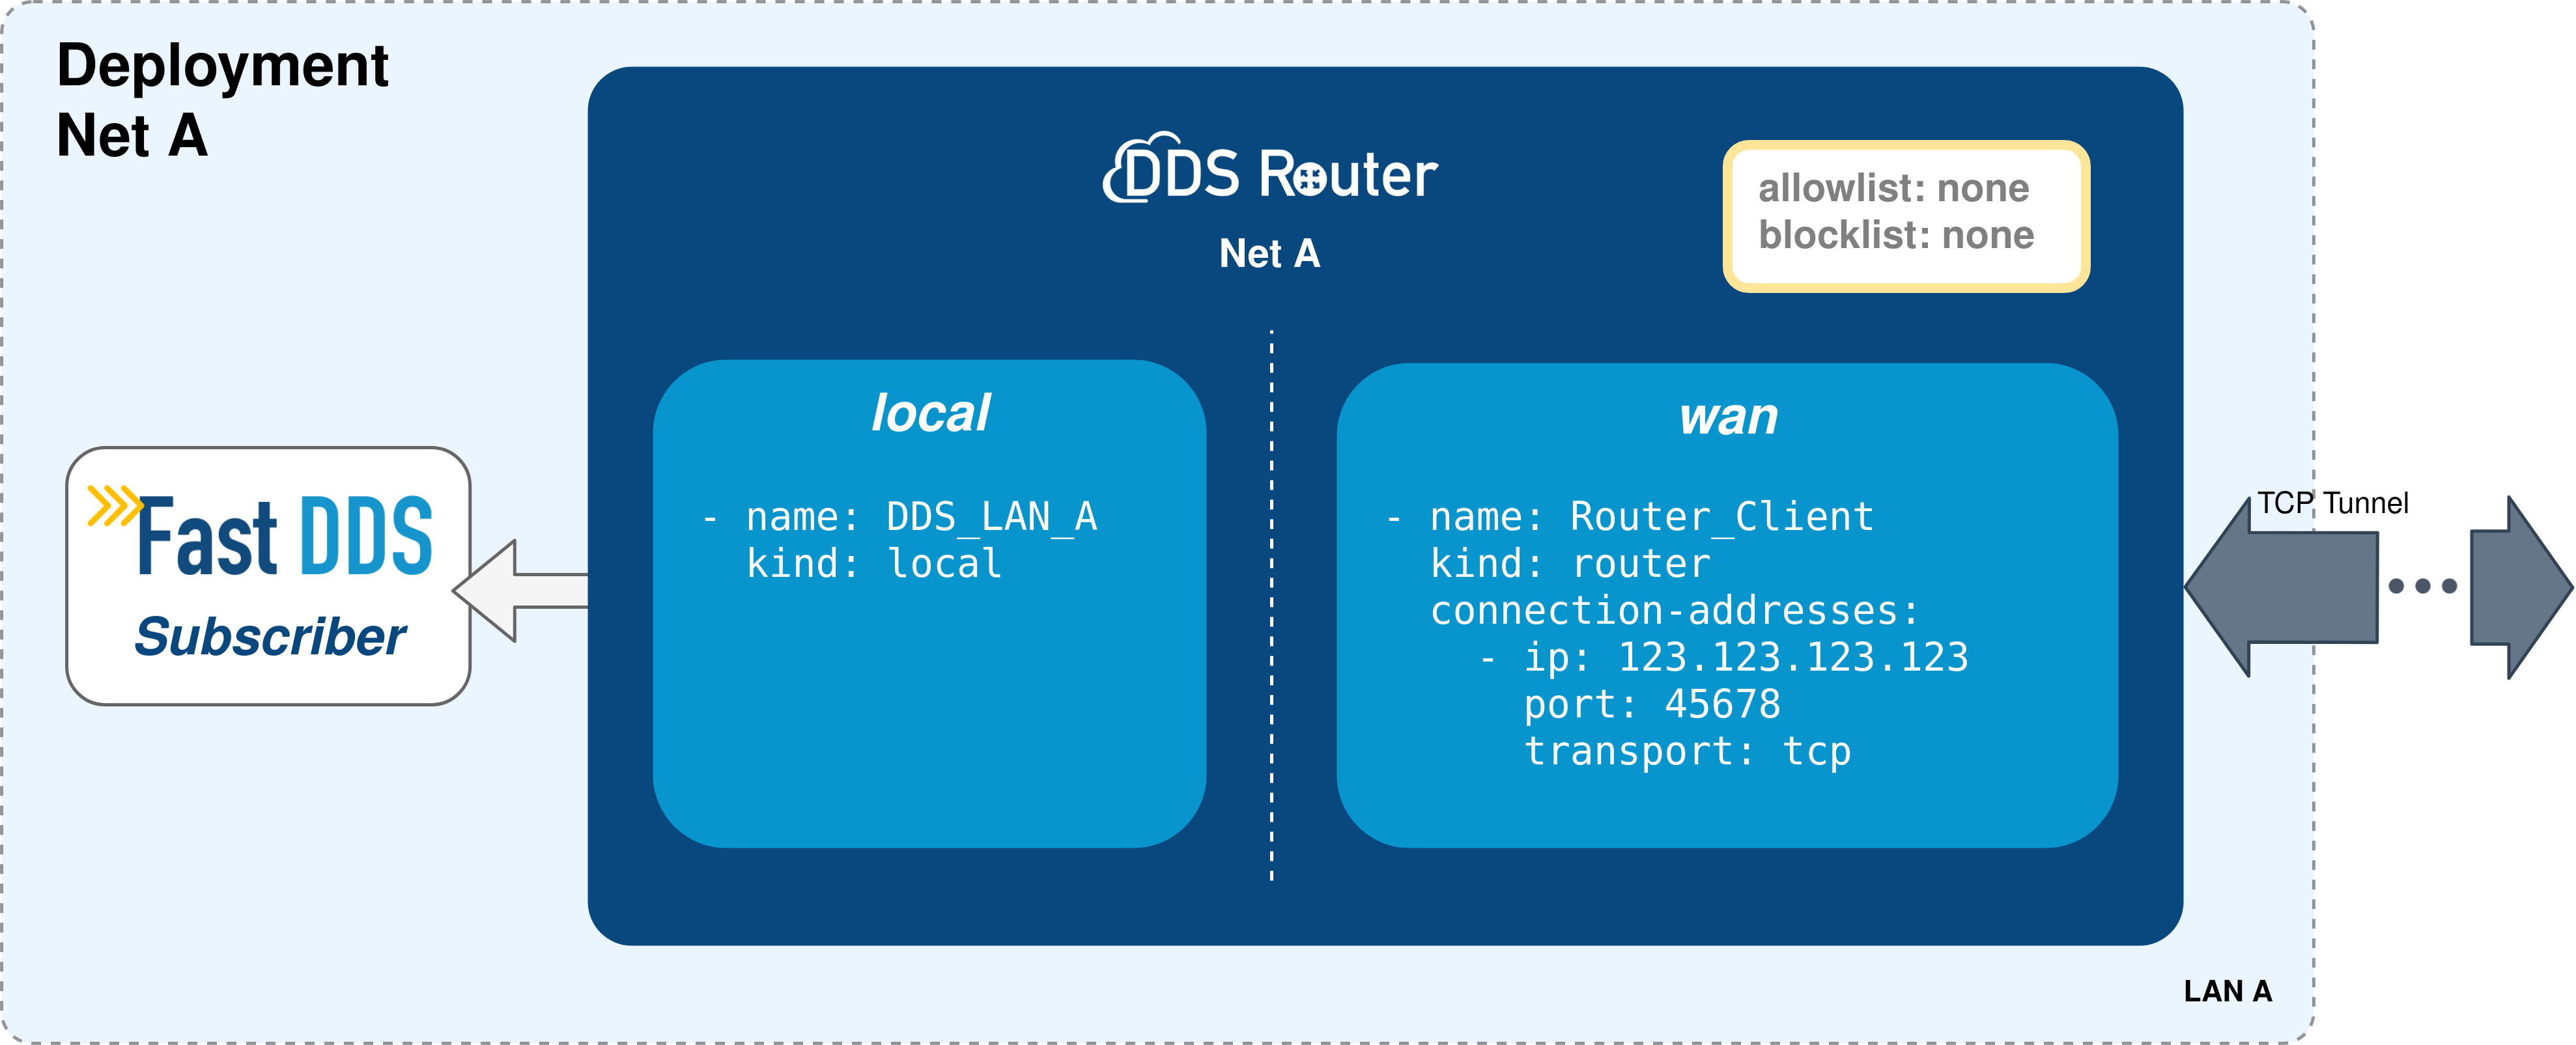
Let’s create first the DDS Router configuration file. It will look like the one shown below.
version: v3.0

participants:

  - name: DDS_LAN_A
    kind: local

  - name: Router_Client
    kind: wan
    connection-addresses:
      - ip: 123.123.123.123
        port: 45678
        transport: tcp
Next, it is briefly explained the most relevant aspects of this configuration file.
The participants are the interfaces of the DDS Router to communicate with other networks.
In this case, we have two participants:
local: this is a simple participant that communicates with all DDS entities it finds in the default DDS Domain, domain 0. For more information about this participant please refer to the Simple Participant section of this documentation.wan: it is a participant designed for WAN communication or the communication between two DDS Routers. It uses the Fast DDS Initial Peers configuration to establish a point-to-point communication between two DDS entities, two DDS Routers in this case. For now it is not necessary to know more about the details of this configuration as you only need to configure the connection address of the DDS Router.For the DDS Router Net A, a connection address shall be defined which must be the same as the one exposed by the DDS Router Net B. There are some relevant configurations within this connection address:
connection-addresses: defines the IP (ip) and port (port) of the network addresses to which it connects, and the transport protocol (transport) to be used in the communication, TCP in this case.
Note
In this case, the DDS Router will forward all topics found in the LAN A DDS network.
However, it is important to mention that the DDS topics relayed by the DDS Router can be filtered by configuring the allowlist and blocklist.
If this is the case please refer to the Topic filtering documentation for information on how to do this.
To finish this step, run the DDS Router with the configuration file created as an argument.
docker run -it -v <path/to/file>/ddsrouter_net_A.yaml:/ddsrouter_net_A.yaml ubuntu-fastdds-suite:<FastDDS-Version>
ddsrouter -c /ddsrouter_net_A.yaml
The following figure summarizes the deployment on LAN A.
1.3. Deployment on Net B
1.3.1. Running Fast DDS Publisher
Run a Docker container using the Fast DDS Suite image.
docker run -it ubuntu-fastdds-suite:<FastDDS-Version>
Run the Fast DDS Publisher executing the following commands:
goToExamples
./dds/BasicConfigurationExample/bin/BasicConfigurationExample publisher \
    --interval 1000 --transport udp
goToExamples
./dds/BasicConfigurationExample/bin/BasicConfigurationExample publisher \
    --interval 1000 --transport udp --domain 1
Note
As stated here, change the DDS Domain Id if running the edge and cloud applications on the same LAN.
1.3.2. Running the DDS Router Net B
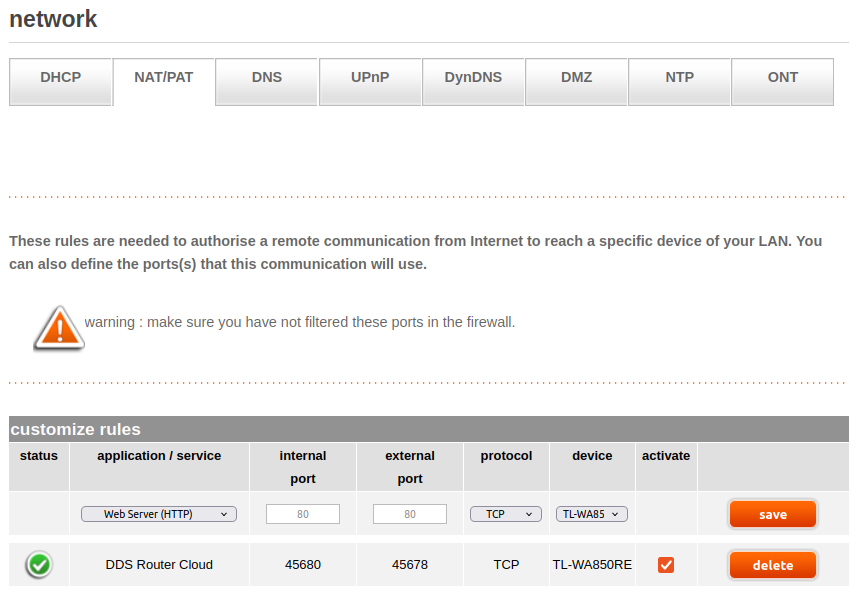
1.3.2.1. Configure transversal NAT on the network router
The first thing to do before starting to configure DDS Router is to configure the network router to allow a remote communication from the Internet to reach a specific device on the LAN, more specifically to expose an IP address and a port to the network that will be used by our DDS Router application.
This configuration will depend on your network router, but it should be similar to the one shown in the following image.
1.3.2.2. Configure the DDS Router Net B
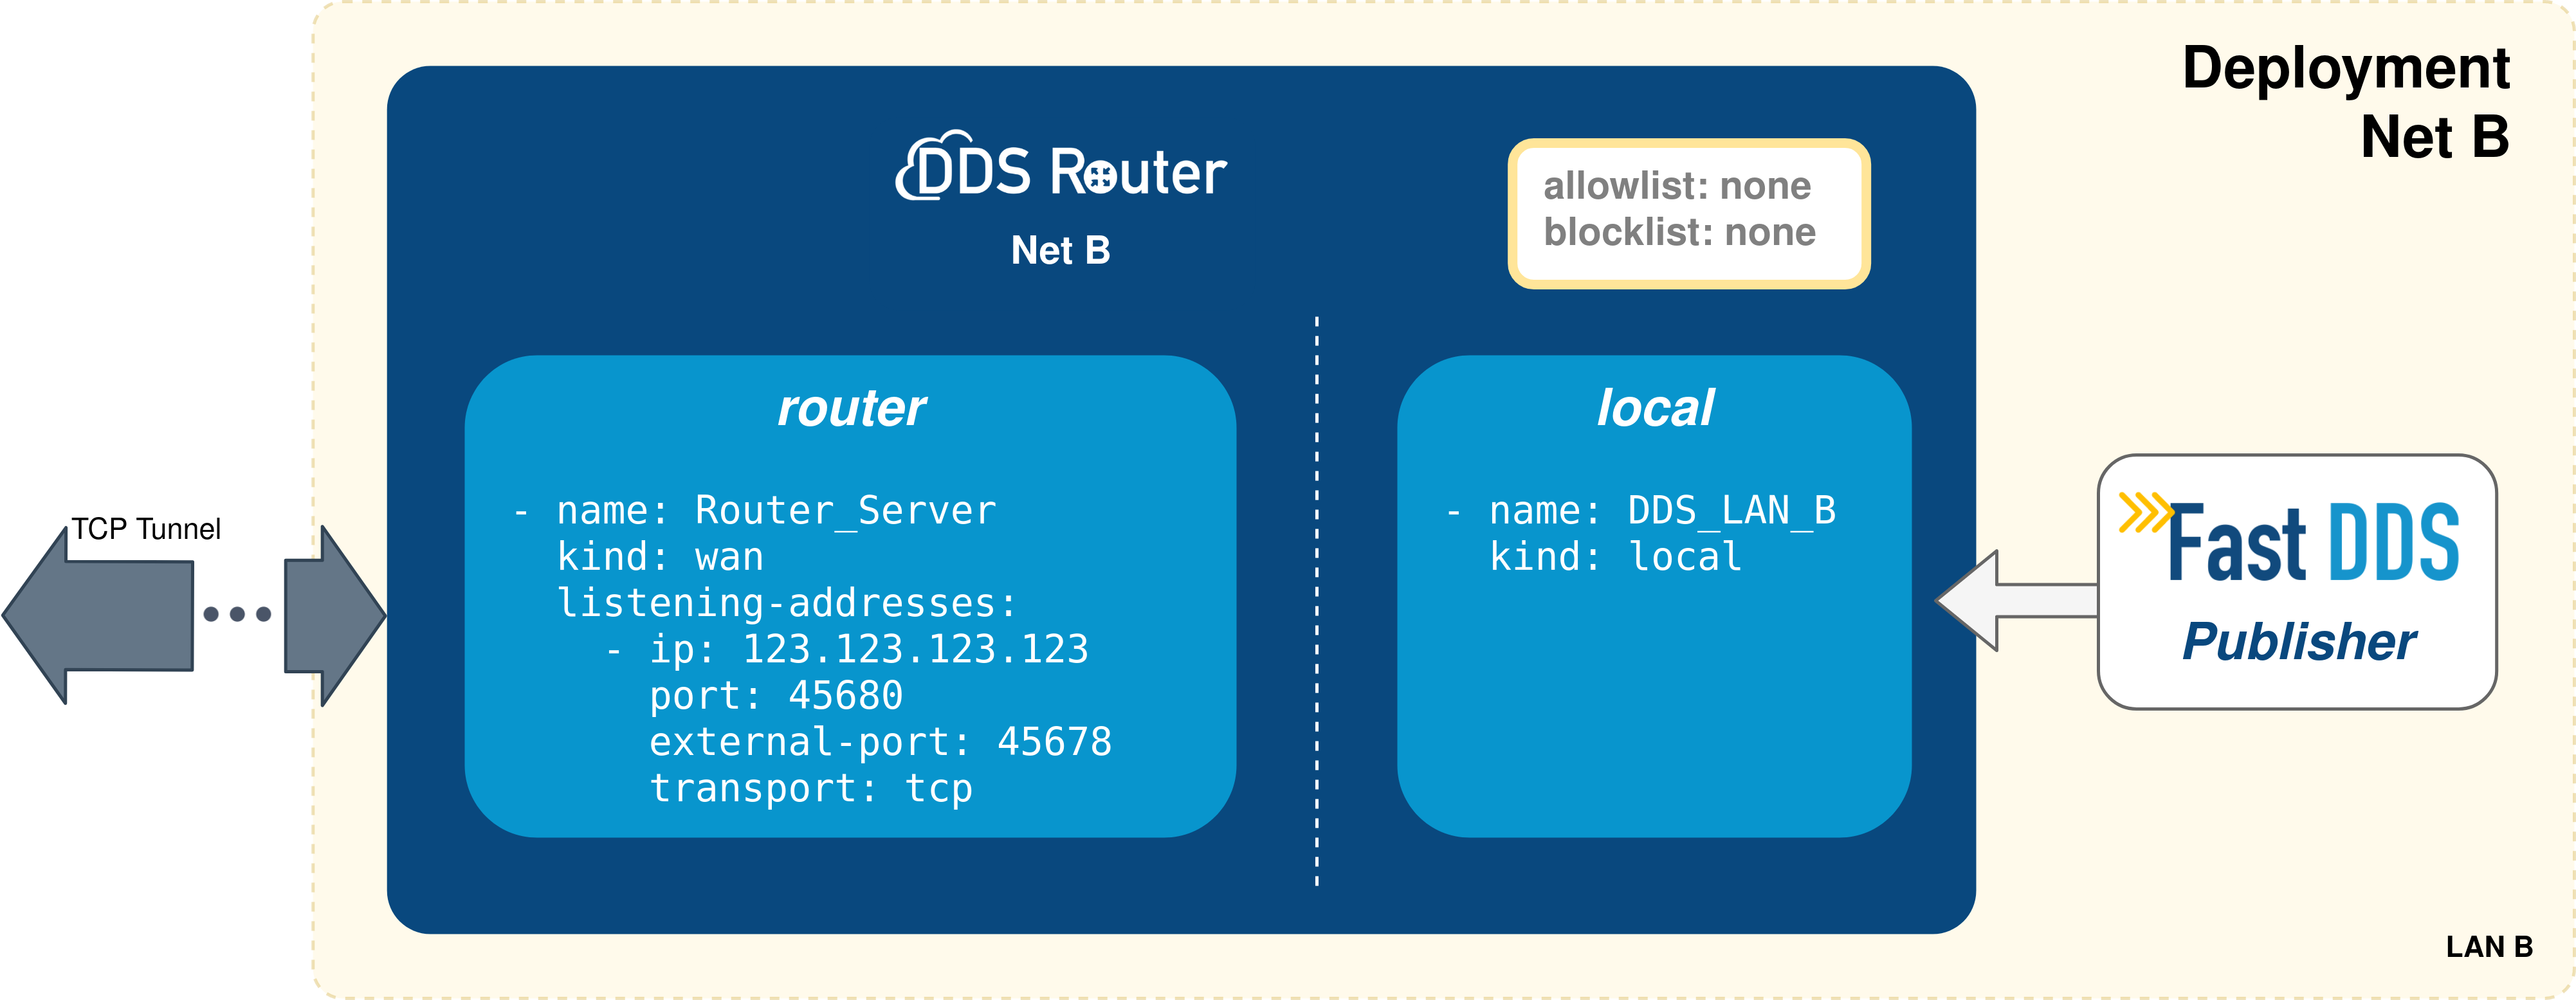
The DDS Router Net B configuration file is quite similar to the DDS Router Net A configuration file, as can be seen below:
version: v3.0

participants:

  - name: DDS_LAN_B
    kind: local

  - name: Router_Server
    kind: wan
    listening-addresses:
      - ip: 123.123.123.123
        port: 45680
        external-port: 45678
        transport: tcp
version: v3.0

participants:

  - name: DDS_LAN_B
    kind: local
    domain: 1

  - name: Router_Server
    kind: wan
    listening-addresses:
      - ip: 123.123.123.123
        port: 45678
        transport: tcp
Note
As stated here, set the DDS Domain Id on the local participant in order to discover the Fast DDS Publisher.
In this case there are also two participants, two communication interfaces for the DDS Router. The first one communicates the DDS Router with any DDS entity, while the second one enables to establish a communication channel with another DDS Router.
Even so there are some differences in the second participant that are worth mentioning.
This participant sets a listening address (listening-addresses), rather than a connection address.
This is because it is the participant that waits for incoming communications since it has this network address exposed and accessible from the Internet.
To finish, run the DDS Router Net B with the above configuration.
docker run -it -v <path/to/file>/ddsrouter_net_B.yaml:/ddsrouter_net_B.yaml ubuntu-fastdds-suite:<FastDDS-Version>
ddsrouter -c /ddsrouter_net_B.yaml
The following figure summarizes the deployment on LAN B.
1.4. Results
If all the steps in this tutorial have been followed, the Fast DDS Subscriber on Deployment Net A should start receiving samples and prompting the following traces:
Message HelloWorld  10 RECEIVED
Message HelloWorld  11 RECEIVED
Message HelloWorld  12 RECEIVED
Message HelloWorld  13 RECEIVED
Message HelloWorld  14 RECEIVED